Summary
This page is meant to be a gateway page to describe and explain a powerful external toolbox for data analysis - the NIRS Toolbox. It is developed and maintained by Dr. Ted Huppert and collaborators in GitHub, and requires MATLAB to run. This page covers basic usage information, loading NIRx files, and where to get help with the software. We also created a section with outdated yet useful resources.
General Information
The NIRS Toolbox is a set of MATLAB-based tools for the analysis of functional near-infrared spectroscopy (fNIRS) developed by Dr. Ted Huppert and his lab at the University of Pittsburgh.
Even though it contains some graphical user interfaces, the main working set consists of different separate (high-level) functions. The toolbox functions can be combined into an analysis pipeline, i.e. a MATLAB script containing all steps of the analysis. It is available for download on the NIRS Toolbox GitHub page.
For a general overview of how the toolbox is designed, please have a look at its reference paper (Santosa et al., 2018). It is actively under development (as of November 2024), and widely used in the literature.
Selected Publications
Santosa, H., Zhai, X., Fishburn, F., & Huppert, T. (2018). The NIRS Brain AnalyzIR Toolbox. Algorithms, 11(5), 73. https://doi.org/10.3390/a11050073.
Huppert T. J. (2016). Commentary on the statistical properties of noise and its implication on general linear models in functional near-infrared spectroscopy. Neurophotonics, 3(1), 010401. https://doi.org/10.1117/1.NPh.3.1.010401.
Santosa, H., Aarabi, A., Perlman, S. B., & Huppert, T. J. (2017). Characterization and correction of the false-discovery rates in resting state connectivity using functional near-infrared spectroscopy. Journal of biomedical optics, 22(5), 55002. https://doi.org/10.1117/1.JBO.22.5.055002.
Where do I get help?
We will be happy to provide you with as much assistance as we can with this tool. NIRx has extensive materials and resources to guide you in your first steps. However, please remember that NIRx is not a distributor, nor can we provide expert support on the platform.
By far the best way to get hands-on experience with the toolbox is by following the tutorials and walkthroughs. Feel free to send us any questions that you have on the use of the toolbox, and we will help where we can. If we cannot, we will direct you to either Dr. Ted Huppert's lab page or to the fNIRS Analysis club Facebook group, where you can get help from experts on this platform. The creators of NIRS Toolbox are monitoring the page most these days, as well as other users of NIRS Toolbox. You must request access to the group and are usually granted within a week or two.
Resources
Installation
To install and use the NIRS Toolbox, you will require a MATLAB License alongside some toolboxes depending on the functions you would like to use from it. The code is open and maintained on their GitHub page. Please check their page for the latest installation version and dependencies.
Brief walkthrough
This walkthrough is intended to give a little background in the use of the NIRS Toolbox to the user who is just getting started. Keep in mind that the space to get most up-to-date advice and guidance is through the NIRS Toolbox official support outlets. We built these resources and do our best to ensure they are up to date but we do not officially distribute or provide expert support to it.
How is the toolbox structured?
Let us take a moment to get used to how the toolbox is structured and thought-through. It is built to be intuitive, but there is a learning curve as with most programming languages and packages.
The NIRS Toolbox is a set of MATLAB-based tools (functions and scripts) and, hence, some prior experience in programming, and of MATLAB in particular, is advisable. A good starting point for those who are not familiar with this software would be watching some starter tutorials available on the MATLAB Support site. The basic workflow is similar to the one depicted in Figure 1 below:
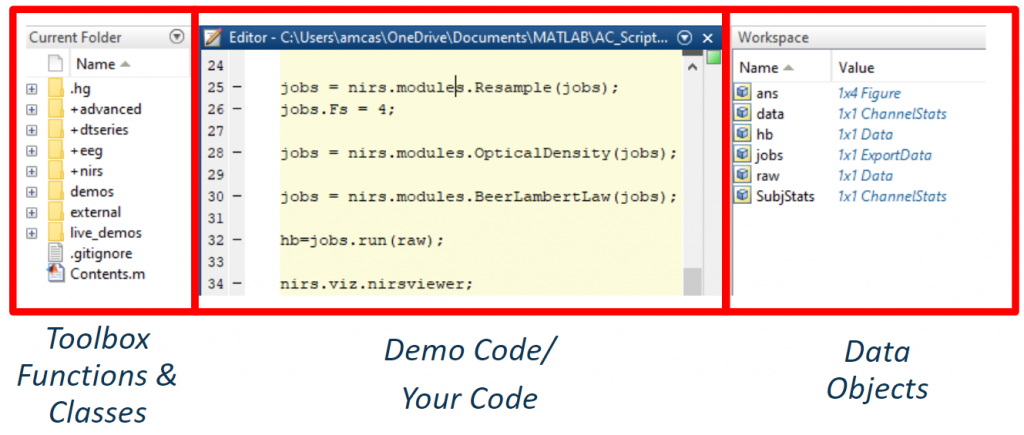
Figure 1: Example of a MATLAB workspace with description boxes.
In the MATLAB workspace, you can find several work windows. Beware that these windows can all be customized and changed depending on the user's preferences, so do not rely 100% on the image. Relevant to the current use are the following:
-
Current Folder: where the directory of your MATLAB instance is currently looking at. Any functions in this directory will run when called. In this example, the user's current folder is the root folder where the Toolbox files were extracted, containing all its functions and classes.
-
Script Editor: the user’s code is located here, either if it is a self-created pipeline or a pre-existent demo code. Any changes may be edited and saved according to the user preferences. Think of this as a slightly more powerful notepad that understands MATLAB code.
-
Workspace: hosts all data objects created and/or loaded while the data processing lasts. The workspace is quite powerful for new users as it allows a non-abstract view of the data structures, where one can see which type and dimensions a given structure has.
The Toolbox uses Object Oriented Programming, meaning the whole environment is defined in namespaces and classes. Namespaces are special folders containing class folders, function, class definition files, and other packages (namespaces). The names of classes and functions are scoped to these special folders. A class is a data structure (more of this may be seen in Code Structure section). This kind of programming allows for context specific calling of variables and functions, which makes it very versatile.
Using the dot operator to navigate through namespaces and define their properties and objects, any function may be called. E.g., to call the function for baseline correction (see Figure 2), we must navigate from the first namespace (see picture on the right) through the second one (center picture) and finally name the chosen function: namespace.namespace.function → nirs.modules.BaselineCorrection().
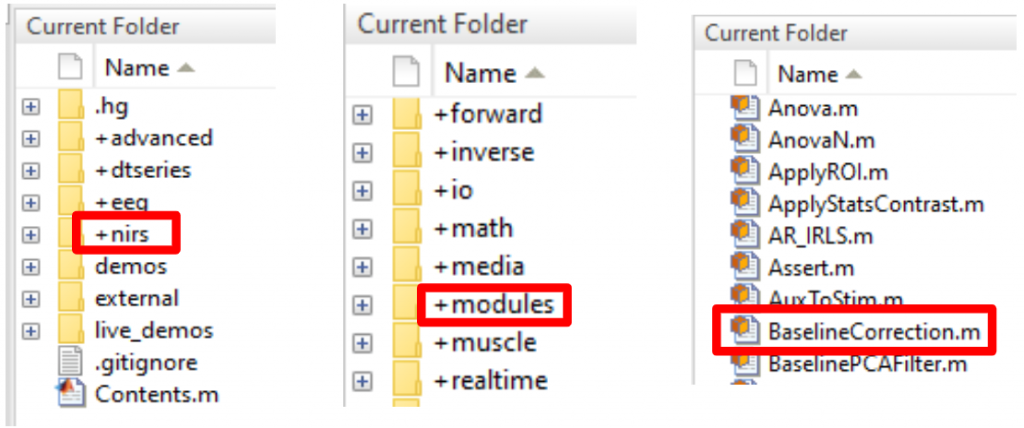
Figure 2: Example of folder structure for dot-operation function.
In addition, most classes have properties and objects that define them and which may be modified according to the user’s intention. The same procedure must be applied: the property to be edited is accessed by setting its path in the data structure: e.g. objectname.property.property → raw.probe.defaultdrawfcn = 3D mesh.
Code Structure
Now, let us get a bit more specific. Let us talk in fNIRS terms. The objects previously mentioned are self-contained representations of the fNIRS data and contain all the information needed to pass between processing modules. They may be defined as data structures and are organized with the following nomenclature:
-
Data: Holds time-series information including stimulus events.
-
Probe: Holds information about the probe design and registration.
-
ChannelStats: Holds the statistical maps in first and second-level analysis.
-
ChannelFStats: Holds F-statistics in channelSpace.
-
ImageStats: Holds the statistics for reconstructed images.
-
sFCStats: Holds connectivity and hyper-scanning statistical models.
All these classes have methods that work as user commands. The NIRS Toolbox documentation describes them more in detail, but most of the classes have draw methods to draw the values held in the object and table methods to display the values in a table, among other class-specific commands.
NIRS Toolbox user manual (latest update August 2020)
Despite being outdated, this manual can be super helpful in getting started with the toolbox as it offers a visual journey and a walkthrough on some of the functions of the toolbox. Please find a link to access it here.
Functional Connectivity walkthrough (latest update July 2020)
Yet again, despite being quite outdated, this manual can help get you started with Functional Connectivity within the NIRS Toolbox. Please find a link to access it here.
Sample scripts (check GitHub for most up-to-date versions)
In the Dr. Huppert’s Brain Imaging Lab page you can find additional information and available demos scripts.
Videos
|
Video 1: Introduction to NIRS Toolbox: Installation & Getting Started.
|
 Figure 3: Introduction to NIRS Toolbox (Brain AnalyzIR).
|
|
Video 2: Motion Artifact and Corrections in NIRS Toolbox (Brain AnalyzIR) with Dr. Ted Huppert.
|
Video 3: Motion Correction Walkthrough in NIRS Toolbox (Brain AnalyzIR) with Dr. Ted Huppert.
|
|
Video 4: Group Level Analysis with Dr. Ted Huppert.
|
 Figure 4: Group Level Analysis with Dr. Ted Huppert.
|
|
Video 5: Short channels analysis in the AnalyzIR toolbox with Dr. Hendrik Santosa.
|
 Figure 5: fNIRS Analysis Options For Data Including Short Channels.
|
|
Video 6: Image Reconstruction in fNIRS with Dr. Ted Huppert.
|
References
Santosa, H., Zhai, X., Fishburn, F., & Huppert, T. (2018). The NIRS Brain AnalyzIR Toolbox. Algorithms, 11(5), 73. https://doi.org/10.3390/a11050073.